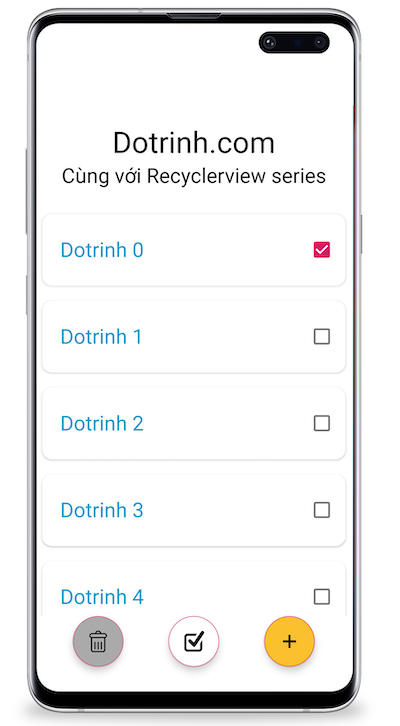
Trong bài này chúng ta sẽ đi thực hiện ý tưởng:
Cho người dùng thêm 1 row mới vào danh sách, thực hiện xóa những cái row nào đã được check, cho phép select all/unselect các row với 1 nút.
Các thứ chúng ta cần làm:
- Thêm nút Floating để add row, select all, del.
- Refresh Adapter và scroll đến vị trí cuối khi add.
- Xử lí nút xóa hàng loạt.
Về môi trường thì y hệt như ở bài 1 mình đang dùng, nếu bạn chưa đọc thì nên xem qua ở link này https://dotrinh.com/lap-trinh-voi-recyclerview-trong-android-bai-1/
Nào chúng ta bắt đầu.
Thêm nút Floating để add row, select all, del
Chúng ta thêm 3 nút sau vào main layout. Bạn để ý phần in đậm nghiêng bên dưới:
<?xml version="1.0" encoding="utf-8"?>
<android.support.constraint.ConstraintLayout xmlns:android="http://schemas.android.com/apk/res/android"
    xmlns:app="http://schemas.android.com/apk/res-auto"
    xmlns:tools="http://schemas.android.com/tools"
    android:layout_width="match_parent"
    android:layout_height="match_parent"
    android:background="@android:color/white"
    tools:context=".MainActivity">

    <TextView
        android:id="@+id/textView"
        android:layout_width="wrap_content"
        android:layout_height="wrap_content"
        android:layout_marginTop="20dp"
        android:text="Dotrinh.com"
        android:textColor="@android:color/black"
        android:textSize="33sp"
        app:layout_constraintLeft_toLeftOf="parent"
        app:layout_constraintRight_toRightOf="parent"
        app:layout_constraintTop_toTopOf="parent" />


    <TextView
        android:id="@+id/textView2"
        android:layout_width="wrap_content"
        android:layout_height="wrap_content"
        android:text="Cùng với Recyclerview series"
        android:textColor="@android:color/black"
        android:textSize="23sp"
        app:layout_constraintLeft_toLeftOf="parent"
        app:layout_constraintRight_toRightOf="parent"
        app:layout_constraintTop_toBottomOf="@+id/textView" />

    <android.support.v7.widget.RecyclerView
        android:id="@+id/myRecycleView"
        android:layout_width="0dp"
        android:layout_height="0dp"
        android:layout_marginTop="20dp"
        app:layout_constraintBottom_toBottomOf="parent"
        app:layout_constraintEnd_toEndOf="parent"
        app:layout_constraintStart_toStartOf="parent"
        app:layout_constraintTop_toBottomOf="@+id/textView2"
        tools:listitem="@layout/row_item" />

    <android.support.design.widget.FloatingActionButton
        android:id="@+id/delActionButton"
        android:layout_width="wrap_content"
        android:layout_height="wrap_content"
        android:layout_marginEnd="50dp"
        android:layout_marginBottom="32dp"
        android:backgroundTint="@android:color/darker_gray"
        android:clickable="true"
        app:layout_constraintBottom_toBottomOf="parent"
        app:layout_constraintEnd_toStartOf="@+id/allActionButton"
        app:layout_constraintHorizontal_bias="0.5"
        app:layout_constraintStart_toEndOf="@+id/myRecycleView"
        app:srcCompat="@drawable/del" />

    <android.support.design.widget.FloatingActionButton
        android:id="@+id/allActionButton"
        android:layout_width="wrap_content"
        android:layout_height="wrap_content"
        android:layout_marginBottom="32dp"
        android:backgroundTint="@android:color/white"
        android:clickable="true"
        app:layout_constraintBottom_toBottomOf="@+id/myRecycleView"
        app:layout_constraintEnd_toStartOf="@+id/addActionButton"
        app:layout_constraintHorizontal_bias="0.5"
        app:layout_constraintStart_toEndOf="@+id/delActionButton"
        app:srcCompat="@drawable/all" />

    <android.support.design.widget.FloatingActionButton
        android:id="@+id/addActionButton"
        android:layout_width="wrap_content"
        android:layout_height="wrap_content"
        android:layout_marginStart="50dp"
        android:layout_marginBottom="32dp"
        android:backgroundTint="@android:color/holo_orange_dark"
        android:clickable="true"
        app:layout_constraintBottom_toBottomOf="parent"
        app:layout_constraintEnd_toStartOf="@+id/myRecycleView"
        app:layout_constraintHorizontal_bias="0.5"
        app:layout_constraintStart_toEndOf="@+id/allActionButton"
        app:srcCompat="@drawable/add" />
</android.support.constraint.ConstraintLayout>
Refresh Adapter và scroll đến vị trí cuối khi Add
Tiếp theo chúng ta cần cấu hình lại adapter đưa adapter và recyclerview ra thành field và xử lý nghe sự kiện các nút như sau:
public class MainActivity extends AppCompatActivity implements View.OnClickListener {

RecyclerView myRecycleView;
private LinearLayoutManager layoutManager;
ChildAdapter adapter;
int lastVisibleItem;
....
myRecycleView = findViewById(R.id.myRecycleView);
layoutManager = new LinearLayoutManager(this, LinearLayoutManager.VERTICAL, false);
myRecycleView.setLayoutManager(layoutManager);
adapter = new ChildAdapter();
myRecycleView.setAdapter(adapter);
findViewById(R.id.delActionButton).setOnClickListener(this);
findViewById(R.id.allActionButton).setOnClickListener(this);
findViewById(R.id.addActionButton).setOnClickListener(this);
myRecycleView.addOnScrollListener(onScrollListener);

...

@Override
    public void onClick(View v) {
        switch (v.getId()) {
            case R.id.delActionButton:
                LogI("del");
                break;
            case R.id.allActionButton:
                LogI("all");
                break;
            case R.id.addActionButton:
                int nextId;
                if (people.size() == 0) {
                    nextId = 0;
                } else {
                    nextId = (people.get(people.size() - 1).getId()) + 1;
                }
                people.add(new Person(nextId, "Dotrinh", false));
                if (lastVisibleItem == nextId) {
                    myRecycleView.scrollToPosition(nextId);
                } else {
                    myRecycleView.smoothScrollToPosition(nextId);
                }
                adapter.notifyDataSetChanged();
                break;
            default:
                break;
        }
    }
}
Khi click vào nút add ta cần thêm vào cuối mảng và cập nhật lại giao diện bằng hàm notifyDataSetChanged() quen thuộc.
Thêm một chút hiệu ứng khi scroll nếu đang không ở vị trí cuối:
private RecyclerView.OnScrollListener onScrollListener = new RecyclerView.OnScrollListener() {
    @Override
    public void onScrollStateChanged(@NonNull RecyclerView recyclerView, int newState) {
        super.onScrollStateChanged(recyclerView, newState);
    }

    @Override
    public void onScrolled(@NonNull RecyclerView recyclerView, int dx, int dy) {
        super.onScrolled(recyclerView, dx, dy);
        int sumVisibleItem = layoutManager.getChildCount(); // tuy theo do cao cua row va do cao cua man hinh
        int sum = layoutManager.getItemCount(); // bang voi size cua array list
        int firstVisibleItemPos = layoutManager.findFirstVisibleItemPosition(); // dong dau tien dc hien thi tren man hinh
        lastVisibleItem = firstVisibleItemPos + sumVisibleItem;
    }
};
Bây giờ đã có thể thêm mượt mà rồi, bạn cbuild thử xem sao.
Xử lí nút xóa hàng loạt
Thêm vào case trong switch như sau:
case R.id.delActionButton:
    int c = people.size() - 1;
    for (int i = c; i >= 0; i--) {
        if (people.get(i).isCheck()) {
            people.remove(i);
            adapter.notifyItemRemoved(i);
            c--;
        }
    }
    break;
Xử lí nút chọn/bỏ chọn hàng loạt
Ý tưởng của mình ở đây là nếu trong danh sách có thằng nào không được chọn thì reset trạng thái thành true, nếu tất cả các row mà đang được chọn thì mới bỏ chọn.
boolean isUncheck = false;
for (Person it : people) {
    if (it.isCheck()) {
        isUncheck = true;
    } else {
        isUncheck = false;
        break;
    }
}
if (isUncheck) {
    for (Person it : people) {
        it2.setCheck(false);
    }
} else {
    for (Person it : people) {
        it2.setCheck(true);
    }
}
adapter.notifyDataSetChanged();
Full code file MainActivity:
public class MainActivity extends AppCompatActivity implements View.OnClickListener {

    ArrayList<Person> people = new ArrayList<>();
    RecyclerView myRecycleView;
    private LinearLayoutManager layoutManager;
    ChildAdapter adapter;
    int lastVisibleItem;

    @Override
    protected void onCreate(Bundle savedInstanceState) {
        requestWindowFeature(Window.FEATURE_NO_TITLE);
        getWindow().setFlags(WindowManager.LayoutParams.FLAG_FULLSCREEN, WindowManager.LayoutParams.FLAG_FULLSCREEN);
        super.onCreate(savedInstanceState);
        setContentView(R.layout.activity_main);
        initData();
        myRecycleView = findViewById(R.id.myRecycleView);
        layoutManager = new LinearLayoutManager(this, LinearLayoutManager.VERTICAL, false);
        myRecycleView.setLayoutManager(layoutManager);
        adapter = new ChildAdapter();
        myRecycleView.setAdapter(adapter);
        findViewById(R.id.delActionButton).setOnClickListener(this);
        findViewById(R.id.allActionButton).setOnClickListener(this);
        findViewById(R.id.addActionButton).setOnClickListener(this);
        myRecycleView.addOnScrollListener(onScrollListener);
    }

    void initData() {
        for (int i = 0; i < 10; i++) {
            people.add(new Person(i, "Dotrinh", false));
        }
    }

    @Override
    public void onClick(View v) {
        switch (v.getId()) {
            case R.id.delActionButton:
                int c = people.size() - 1;
                for (int i = c; i >= 0; i--) {
                    if (people.get(i).isCheck()) {
                        people.remove(i);
                        adapter.notifyItemRemoved(i);
                        c--;
                    }
                }
                break;
            case R.id.allActionButton:
                for(Person it:people){
                    it.setCheck(!it.isCheck());
                }
                adapter.notifyDataSetChanged();
                break;
            case R.id.addActionButton:
                int nextId;
                if (people.size() == 0) {
                    nextId = 0;
                } else {
                    nextId = (people.get(people.size() - 1).getId()) + 1;
                }
                people.add(new Person(nextId, "Dotrinh", false));
                if (lastVisibleItem == nextId) {
                    myRecycleView.scrollToPosition(nextId);
                } else {
                    myRecycleView.smoothScrollToPosition(nextId);
                }
                adapter.notifyDataSetChanged();
                break;
            default:
                break;
        }
    }


    private RecyclerView.OnScrollListener onScrollListener = new RecyclerView.OnScrollListener() {
        @Override
        public void onScrollStateChanged(@NonNull RecyclerView recyclerView, int newState) {
            super.onScrollStateChanged(recyclerView, newState);
        }

        @Override
        public void onScrolled(@NonNull RecyclerView recyclerView, int dx, int dy) {
            super.onScrolled(recyclerView, dx, dy);
            int sumVisibleItem = layoutManager.getChildCount(); // tuy theo do cao cua row va do cao cua man hinh
            int sum = layoutManager.getItemCount(); // bang voi size cua array list
            int firstVisibleItemPos = layoutManager.findFirstVisibleItemPosition(); // dong dau tien dc hien thi tren man hinh
            lastVisibleItem = firstVisibleItemPos + sumVisibleItem;
        }
    };

    public class ChildAdapter extends RecyclerView.Adapter<ChildAdapter.ChildViewHolder> {

        @Override
        public int getItemCount() {
            return people.size();
        }

        public ChildAdapter.ChildViewHolder onCreateViewHolder(@NonNull ViewGroup parent, int viewType) {
            View itemView = LayoutInflater.from(parent.getContext()).inflate(R.layout.row_item, parent, false);
            return new ChildViewHolder(itemView);
        }

        @Override
        public void onBindViewHolder(@NonNull ChildAdapter.ChildViewHolder holder, int position) { // this method will call every time when we refresh recyclerview
            holder.rowItem.setText(people.get(position).getName() + " " + people.get(position).getId());
            holder.checkBox.setChecked(people.get(position).isCheck());
            LogI("dong thu: " + position);
        }

        // VIEW HOLDER
        class ChildViewHolder extends RecyclerView.ViewHolder implements View.OnClickListener, CheckBox.OnCheckedChangeListener {

            CardView card_view;
            TextView rowItem;
            CheckBox checkBox;

            ChildViewHolder(@NonNull View itemView) {
                super(itemView);
                card_view = itemView.findViewById(R.id.cardView);
                rowItem = itemView.findViewById(R.id.rowItem);
                checkBox = itemView.findViewById(R.id.checkBox);
                card_view.setOnClickListener(this);
                checkBox.setOnCheckedChangeListener(this);
            }

            @Override
            public void onClick(View v) {
                people.get(getAdapterPosition()).setCheck(!people.get(getAdapterPosition()).isCheck());
                notifyDataSetChanged();
            }

            @Override
            public void onCheckedChanged(CompoundButton buttonView, boolean isChecked) {
                people.get(getAdapterPosition()).setCheck(isChecked);
            }
        }

    }
}
Build lại lần nữa và xem kết quả:

Mã nguồn toàn bộ series mình đặt ở github, hãy checkout ở đây https://github.com/dotrinhdev/Recyclerview
Các bài viết không xem thì tiếc:
- Lập trình với Recyclerview trong Android – Bài 1 | dotrinh.com
- Lập trình với Recyclerview trong Android – Bài 2 | dotrinh.com
- Siêu tổng hợp android code snippets (cập nhật thường xuyên)
- Siêu tổng hợp iOS code snippets – Objective C
- Chuyển một đối tượng sang Json trong Android
- Truyền dữ liệu giữa 2 fragment trong android
- Lập trình phóng to thu nhỏ ảnh pinch in – pinch out trong Android
- Tạo seekbar và kiến thức hữu ích về seekbar trong Android
- Gửi dữ liệu đến BLESerial3 bằng Bluetooth LE Android
- Làm việc với font trong Android
- Làm sao thiết kế nhiều màn hình trong Android
- Show Indicator trong Android | Hiển thị indicator trong Android
- Truyền dữ liệu giữa các Activity trong android
- Hiểu về cách tổ chức file, bộ nhớ của app Android
- Cách dùng AsyncTask trong Android


1 Comment